
1.
Scan your object and bring up the jpeg on your photo manager or copy
and paste it into a text program and adjust the size of the image to
the size stamp you want to make.

2. Print the image.
3.
Using a very soft artist pencil, I used a 4B, draw the outline and
details of the image simply tracing around the printed image.

4. Make sure you get a good amount of graphite from the pencil onto the image.

5. Place the image face (graphite)
side down on the carving medium. I used Soft-Kut. Rub the back of
the paper firmly with the back of a spoon while holding the paper in
place.


6. Go over the graphite lines with a permanent fine point ink pen.


6.
I start with the thinnest blade in my carving set. I have a very
inexpensive 5 blade set. I do the fine details first then increase the
blade size and cut more and more of the background away leaving the
image behind. I call this a positive image because when I stamp this
the stamped image will be of the image on the jpeg. You could also cut
away the image leaving the background. I call this a negative because
when you stamp the image, the background will have color and the image will be a void.

7. When I have cut away all of the background leaving the image, I
test stamp it on paper with ink. I can touch up the stamp image if I
need to at this time.

8.
If I am happy with the stamp, I trim away all but a 1/2-5/8” boarder
around the image. I stamp the image with ink onto a piece of wood then
using GOOP attach the stamp to the other side of the wood. I usually do
this for images I am planning to keep and reuse many times. Some
stamps I carve for a one time use like my friends dog picture. I will
probably not use this stamp again. Most of my stamps I reuse over and
over. The wooden mounting gives the Soft-Kut material a firm
support making goopy mistakes less probable.
9. Here is the feather and its image in pearl acrylic paint on black fabric.
I learned these techniques from Lyric Kinards "Surface Design Sampler
Platter" DVD.
Lately I have been using a certain motif, a picture of a man, in all sorts of work. The man happens to be my brother and it all started when I did a 4 color fabric portrait of him. I am now doing a totally stitched portrait of him along with Judith (quiltordye) who is working on her own motif in stitch. I digress.
I took the photo of my brother and made it greyscale then posterized it in two values. I also tweeked the contrast a bit before posterizing til I got an image I liked.


I took a soft lead pencil (#7) and penciled in, laying down graphite, over the areas that were black. I didn't do the entire background, just a band and all the details inside the face.

I think you can see the shiny graphite around the image. Then I cut the image to the width of my stamp material. I used soft-kut from Dick Blick. It is dead cheap. A 4x6 sheet cost a bit over $1. As you can see from this photo I missed filling the dark patch next to the mouth with graphic. Drats. Then I took the soft-kut and laid the image graphite side down and rubbed the back of the paper as hard as I could with a spoon back to move the graphite from the paper onto the soft-kut.


I thought I took a photo of the soft-kut BEFORE I went over the lines with a permanent ink pen but I guess I didn't. Oh well. When I removed the paper after transferring the graphite onto the soft-kut, I drew "cutting" lines because the graphite is unstable and will rub off easily. I think my paper shifted about and my image was not as crisp as I know it could be. Probably taping the paper to the substrate before rubbing the graphite image would be a good idea. Learn from my mistake. Now it is time to start the cutting process.

I used Speedball linoleum cutters, also dead cheap at Dick Blicks, like under $7 for a handle and 5 blades. I also used an Xacto knife to do intricate cuts.


The upper picture is my first cut and the lower photo is after removing a large amount of soft-kut near the chin.
When I used the Xacto knife I used it in a bevel so as to keep the material (soft-kut) as stable as possible. I will show you what I mean using this eraser. I place the knife on a bevel towards the area to be removed, then the next cut is beveled towards the first cut. The excess to be removed easily pops out.

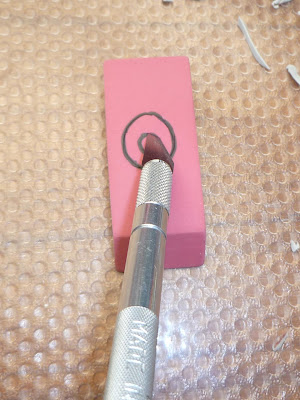
 See how the bevel stabilizes the center image?
OK, after removing all the material from the stamp, it's time to print a rough sample image to see what I forgot or what is too high and getting into my image.

I "think" I am done so I ink up the stamp and print.

The paper with the graphite is on the left, the rubber stamp is on the right and my first printing of the image is in the center. I see some high spots (on the forehead) and I take this opportunity to trim away "hairs". You can even see where the high spots have ink on them on the stamp.

This is a close-up of "hairs" on the first print. I also had forgotten a piece near the mouth so I cleaned it up and printed again.
 Better
Now I want to mount this stamp onto a rigid substrate so my fingers wont push too hard on the carved areas which are now thinner than the raised areas. This will give me nice stable uniform pressure when printing. I have plans for this stamp. I want to do multiple touching images a'la Andy Warhol so I want my backing to be the exact same size at the stamp to make calibration easier. You'll see what I mean when I make my prints. I used rigid 1" insulation board, rough cut a piece maked it with the stamp on it and made the final cut on my bandsaw (because I have one). A knife or razor will also make a nice cut.

 marking the exact size of the stamp

Now it's time to attach the stamp to the rigid backing. I used Elmers contact cement. Paint it on, wait a minute or two til dry then placed the stamp on the substrate. See below.
The Contact cement will want to melt the Styrofoam so apply the cement to the Soft-Kut, press into place and leave it alone over night. If you can let the Contact Cement dry to tacky (about a half hour) you will get an even better bond.

 And then I mark the side with an arrow so I KNOW which way is up. Ask me how I know!!

I decided to use craft paint with a brayer just to see what it looked like. Interesting images. You could see the brayer marks which is neither good nor bad and the image was NOT crisp. Same reaction. It was a good first try. I now know I will do 3 over 3 - 6 images to make a 12X12" square.


Not really what I was going for but a good start. I am making this for a specific purpose but I have used stamps from photographs many other times as motifs in quilts.
I took the photo of my brother and made it greyscale then posterized it in two values. I also tweeked the contrast a bit before posterizing til I got an image I liked.


I took a soft lead pencil (#7) and penciled in, laying down graphite, over the areas that were black. I didn't do the entire background, just a band and all the details inside the face.

I think you can see the shiny graphite around the image. Then I cut the image to the width of my stamp material. I used soft-kut from Dick Blick. It is dead cheap. A 4x6 sheet cost a bit over $1. As you can see from this photo I missed filling the dark patch next to the mouth with graphic. Drats. Then I took the soft-kut and laid the image graphite side down and rubbed the back of the paper as hard as I could with a spoon back to move the graphite from the paper onto the soft-kut.


I thought I took a photo of the soft-kut BEFORE I went over the lines with a permanent ink pen but I guess I didn't. Oh well. When I removed the paper after transferring the graphite onto the soft-kut, I drew "cutting" lines because the graphite is unstable and will rub off easily. I think my paper shifted about and my image was not as crisp as I know it could be. Probably taping the paper to the substrate before rubbing the graphite image would be a good idea. Learn from my mistake. Now it is time to start the cutting process.

I used Speedball linoleum cutters, also dead cheap at Dick Blicks, like under $7 for a handle and 5 blades. I also used an Xacto knife to do intricate cuts.


The upper picture is my first cut and the lower photo is after removing a large amount of soft-kut near the chin.
When I used the Xacto knife I used it in a bevel so as to keep the material (soft-kut) as stable as possible. I will show you what I mean using this eraser. I place the knife on a bevel towards the area to be removed, then the next cut is beveled towards the first cut. The excess to be removed easily pops out.


OK, after removing all the material from the stamp, it's time to print a rough sample image to see what I forgot or what is too high and getting into my image.

I "think" I am done so I ink up the stamp and print.

The paper with the graphite is on the left, the rubber stamp is on the right and my first printing of the image is in the center. I see some high spots (on the forehead) and I take this opportunity to trim away "hairs". You can even see where the high spots have ink on them on the stamp.

This is a close-up of "hairs" on the first print. I also had forgotten a piece near the mouth so I cleaned it up and printed again.

Now I want to mount this stamp onto a rigid substrate so my fingers wont push too hard on the carved areas which are now thinner than the raised areas. This will give me nice stable uniform pressure when printing. I have plans for this stamp. I want to do multiple touching images a'la Andy Warhol so I want my backing to be the exact same size at the stamp to make calibration easier. You'll see what I mean when I make my prints. I used rigid 1" insulation board, rough cut a piece maked it with the stamp on it and made the final cut on my bandsaw (because I have one). A knife or razor will also make a nice cut.

Measuring for a rough cut


Cut perfectly on a bandsaw
The Contact cement will want to melt the Styrofoam so apply the cement to the Soft-Kut, press into place and leave it alone over night. If you can let the Contact Cement dry to tacky (about a half hour) you will get an even better bond.


I decided to use craft paint with a brayer just to see what it looked like. Interesting images. You could see the brayer marks which is neither good nor bad and the image was NOT crisp. Same reaction. It was a good first try. I now know I will do 3 over 3 - 6 images to make a 12X12" square.


Not really what I was going for but a good start. I am making this for a specific purpose but I have used stamps from photographs many other times as motifs in quilts.
This is my SECOND Eric stamp and this one came out great. See the results!!


Fantastic effect. Thanks for the tutorial.
ReplyDeleteThat's great. Thank you. For someone who isn't too confident drawing this is a great technique.
ReplyDeleteWhat a great tutorial. Thank you so much for sharing.
ReplyDeleteJo
Your instructions make this look very doable. Thanks!!!
ReplyDelete